Supports both 6K50 and 4K50 resolutions in VR180 format.
Connection Settings
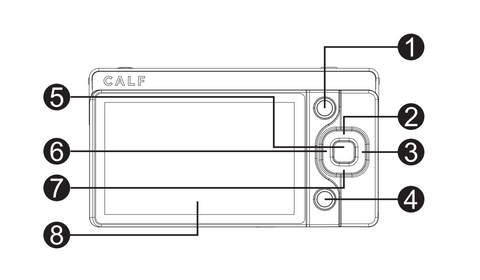
Connect Type-C: Plug in the NIC with Type-C port(③), connect to the wired network, the camera will automatically identify the network card after power on.
Connect WIFI: Power on the camera -> click the "Settings" icon in the bottom right of the screen or "Menu/Ok" button -> enter the menu item -> click "Network" -> open the right menu "WLAN" switch -> click "Available WLAN" -> select the WIFI you need and finish the connection.
Video Parameter Settings
Power on the camera -> click the "Settings" icon in the bottom right of the screen or press the "Menu/Ok" button -> navigate to the menu item -> click "Image Style" -> adjust the video's "Brightness," "Contrast," "Saturation," "Sharpness," and "3D Noise Reduction."
Power on the camera -> click the "Settings" icon in the bottom right of the screen or press the "Menu/Ok" button -> navigate to the menu item -> click "Mode" -> in the right menu, choose "Camera mode" from the drop-down list -> in the "Resolution" drop-down menu, select the resolution needed for live streaming.
Advanced parameter settings: Adjust the professional settings ("white balance," "ISO," "EV," "exposure" and others) through the direction keys on the back of the camera at the right side. The effects of these settings will be displayed on the screen. (② for Up/ISO, ③ for Right/EV (Exposure Value), ⑥ for Left/White Balance, and ⑦ for Down/Exposure Settings)
Live Streaming Settings
Click the "Settings" icon in the bottom right of the screen -> enter the menu item -> click "Live Streaming"-> select and adjust the "Video Encoding," "Bit Rate," and "GOP"related parameters.
Click "Scan Live QR Code" in the "Live" menu-> Put the QR code in Calf App into the yellow box ->if successful, it will automatically return to the "Live" menu ->"Live Streaming Link" will appear on the right side of the streaming address -> click the camera "back button" -> the top left corner of the display wil show the photo shooting icon -> click the camera "shooting button" to start live streaming.
Notes
Please ensure that the NIC (Network Interface Card) with a Type-C interface is connected to the first Type-C port. Alternatively, you can connect to the internet via WiFi, ensuring sufficient bandwidth, speed, and signal stability. During actual live broadcasting, it is advisable to maintain only one type of connection to guarantee stable data transmission.